Home & Garden, Tips & How To

Stenciled Walls in the Entry

Hi all!

Hope you're having a wonderful week!  We are having the most beautiful weather here in Michigan and have broken records for warm temperatures in November.  What a blessing!

Sorry to be gone for so long!  I took a break from decorating my own house and helped my daughter with several projects at her house.  I'm also a 'slow' decorator.  Sometimes I have to think about what I want to do for a while before I know.

But, this week I did something I've been thinking about for a long time!  I repainted our entry way walls and I am so much happier with it!

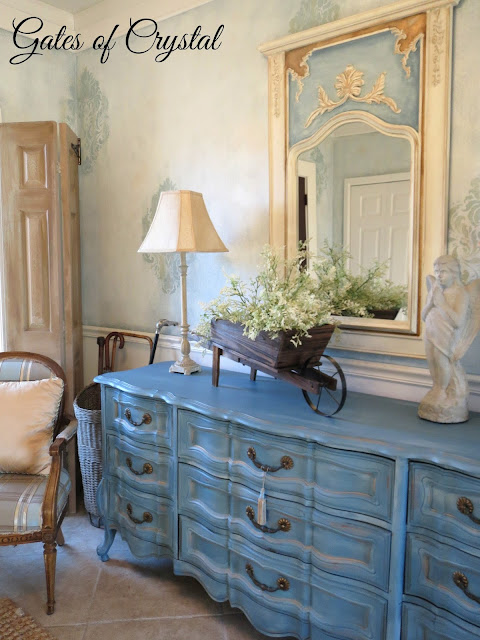
In my last post I showed you how I painted this dresser.  I had put a very large painting over it and just wasn't loving it.  I found this mirror at HomeGoods.  It was all white and I painted the blue and gold to tie it in with the dresser.
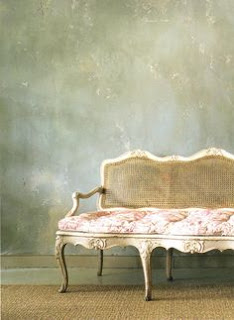
Inspiration picture
And then I just kept being dissatisfied with the walls. I painted this room SW Interesting Aqua about three years ago and even though I liked the color, I just wasn't loving the look.  When I showed my daughter my inspiration picture, she laughed and said, "I like clean and bright.  YOU like 'ruins!'" Ha!  She's right!

I also love patterned walls.  I stenciled this room with the same damask stencil several years ago.  It took me three months to finish and then I wasn't happy with my color choice!  So I didn't want to work that hard again.
I started out with the original color I had on the walls.
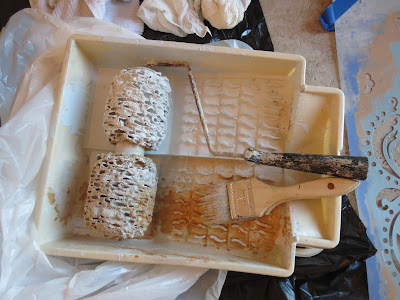
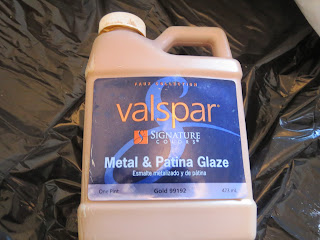
Then using this roller and tray, I put our family room color (which I mixed myself and is about 1/2 the intensity of SW Rain) on one side and a small amount of Valspar Gold Glaze on the other side.
I rolled over the walls until my colors were blended well.  I added the stencil...spacing it around the room. I used SW Interesting Aqua and a little of the gold for the stencil pattern.

I dry brushed over the pattern after I removed the stencil, softening the edges.  
The walls in this room, and a lot of the walls in our house, have a textured wall paper on them that we were not able to remove when we bought our house. The good news is that it was applied so perfectly that there are no seams. The bad news is you can't get new wallpaper to stick on top of this old wall paper. So if I want pattern, I need to use a stencil.

I haven't finished the other side of the room yet.  I'm hoping to have time to finish tomorrow.
I got the wooden wheel barrow at Joss & Main.  The cement garden angel was a gift when we lived in Alabama and I bought the lamps at a discount store in Virginia.
So this room has changed dramatically in the last several months!  I liked it a lot before.  I love it now!

love and blessings~
 "A new commandment I give to you, that you love one another, even as I have loved you, that you also love one another." John 13:34

I'm joining these linky parties:
thededicatedhouse
addisonmeadowslane
too-much-time
Standard
Home & Garden, Tips & How To

Stenciled Walls in the Entry

Hi all!

Hope you're having a wonderful week!  We are having the most beautiful weather here in Michigan and have broken records for warm temperatures in November.  What a blessing!

Sorry to be gone for so long!  I took a break from decorating my own house and helped my daughter with several projects at her house.  I'm also a 'slow' decorator.  Sometimes I have to think about what I want to do for a while before I know.

But, this week I did something I've been thinking about for a long time!  I repainted our entry way walls and I am so much happier with it!

In my last post I showed you how I painted this dresser.  I had put a very large painting over it and just wasn't loving it.  I found this mirror at HomeGoods.  It was all white and I painted the blue and gold to tie it in with the dresser.
Inspiration picture
And then I just kept being dissatisfied with the walls. I painted this room SW Interesting Aqua about three years ago and even though I liked the color, I just wasn't loving the look.  When I showed my daughter my inspiration picture, she laughed and said, "I like clean and bright.  YOU like 'ruins!'" Ha!  She's right!

I also love patterned walls.  I stenciled this room with the same damask stencil several years ago.  It took me three months to finish and then I wasn't happy with my color choice!  So I didn't want to work that hard again.
I started out with the original color I had on the walls.
Then using this roller and tray, I put our family room color (which I mixed myself and is about 1/2 the intensity of SW Rain) on one side and a small amount of Valspar Gold Glaze on the other side.
I rolled over the walls until my colors were blended well.  I added the stencil...spacing it around the room. I used SW Interesting Aqua and a little of the gold for the stencil pattern.

I dry brushed over the pattern after I removed the stencil, softening the edges.  
The walls in this room, and a lot of the walls in our house, have a textured wall paper on them that we were not able to remove when we bought our house. The good news is that it was applied so perfectly that there are no seams. The bad news is you can't get new wallpaper to stick on top of this old wall paper. So if I want pattern, I need to use a stencil.

I haven't finished the other side of the room yet.  I'm hoping to have time to finish tomorrow.
I got the wooden wheel barrow at Joss & Main.  The cement garden angel was a gift when we lived in Alabama and I bought the lamps at a discount store in Virginia.
So this room has changed dramatically in the last several months!  I liked it a lot before.  I love it now!

love and blessings~
 "A new commandment I give to you, that you love one another, even as I have loved you, that you also love one another." John 13:34

I'm joining these linky parties:
thededicatedhouse
addisonmeadowslane
too-much-time
Standard
Home & Garden, Tips & How To

Painting a French Dresser


Yesterday I shared all the changes in our entry, including this French dresser that I refinished.  I found this dresser on Craig's List and purchased it for $100.  

Below is what it looked like when I bought it. It's a very heavy piece and in good solid shape but had some surface scuffs and flaws.
I removed the drawers and took off all the hardware.
  I wanted to emphasize the details on all the drawers.
Using an old plastic tray that had had fruit salad in it, I put blue (the blue I mixed and used on another cabinet) in one section, off white in the small section and the same blue lightened with off white in the third section. I mixed chalk-paint additive into all three colors. I didn't do any pre-sanding as I've found that chalk paint always adheres wonderfully.

I used the lighter blue and painted all around the edges first.
While it was still wet, I painted the center of the drawer fronts the dark blue. It's a subtle difference but does a lot to keep your piece from looking flat and cheap.
When I painted the body of the dresser, I used all three shades of paint to give a very uneven finish.  I added extra of the off-white to the details.
I waited several hours until my paint had dried well and then using a sponge sander, distressed the dresser.  I focused on edges and corners that would naturally get the most wear and tear.

I had to put the hardware back on before I put the drawers back in.  I wanted to make sure my drawers matched the body and knew they'd get stuck and I couldn't get them open without the hardware - because that had already happened earlier!  lol

The next morning I went over the whole dresser with wax made for chalk paint that I purchased at Lowe's.  When it had dried well, I applied Rub n' Buff.  I have this 12 piece sample set.  I haven't had it long.  When I first got it, I experimented with it until I knew what to expect.  It's a great product and so much fun when you're refinishing furniture! (not a sponsored post).

I used the Antique Gold and went over all the curvy edges on the drawers and on the top and bottom of the cabinet.  You can also see the off-white streaks that I blended out on the top. The black streaks you're seeing is Rub n' Buff Ebony.

In this picture you can see the distressing, the Antique Gold and the Ebony Rub 'n Buff I used.  I also used some of the Pewter and Patina (a light turquoise) in places.  They showed a little too much. Any place that I didn't like the effect I just lightly painted over and I liked the subtle difference it made. I wanted it to look like it was originally painted blue with gilt and had gotten worn and faded over the years.  I didn't use any antiquing wax.

The hardware already had an antiqued gold finish and I didn't do anything to it.

When I first put the dresser in the room my daughter wasn't sure she liked it.  She walked in again the day after I had painted it and loved it!  Painting it made all the difference!

I'm always surprised how quickly chalk paint dries.  I waxed the top heavily as everyone who comes into our home drops whatever they have here (on my previous table.)  But the nice thing is the finish is very imperfect and any changes from guests would probably not be noticeable!

If I've left anything out, please feel free to ask questions.  I'm not an expert by any means but will be happy to tell you what I did.

Have a wonderful weekend!

love and blessings~

"For I am not ashamed of the gospel, because it is the power of God that brings salvation to everyone who believes: first to the Jew, then to the Gentile. For in the gospel the righteousness of God is revealed—a righteousness that is by faith from first to last, just as it is written: “The righteous will live by faith.” Romans 1:16-17

I'm joining these great parties:
oursouthernhomesc
dwellings-theheartofyourhome
thoughtsfromalice
lifeonlakeshoredrive
coastalcharm
astrollthrulife
stonegableblog
thriftydecorchick
diybydesign.


savvysouthernstyle
Standard
Home & Garden, Tips & How To

Really BIG Changes in the Entry

Sorry I've been gone this week! I have been working hard the last several days. And it's resulted in lots of changes in our entry.

Do you remember that I mentioned I found a great French dresser a couple of weeks ago for $100? My sweet sons carried it all the way down to the basement while I decided where I was going to put it. How much easier it would have been to leave it in our front entry because that's where I decided I wanted it to go!  lol  Poor guys!  It's very heavy.

It started out looking like this!
Now it looks like this! I also recovered this chair in my faux silk plaid that I used in the living room.

And put the same plaid on my antique settee that sits on the other end of the entry!  I haven't finished the trim yet on these two pieces but will do that in the next couple of days.
For those of you that might not remember this is what our entry looked like the last time you saw it.  I love, love, love this table (and all the tables) that my husband has made but felt this side of the room was a lot more rustic than the other side.  Now it's not! This beautiful table has found a new home in our rustic basement.

I also painted the shutters in this room a medium brown.

This painting has been in our master bedroom.  I bought it at Kirkland's about 15 years ago when we lived in Virginia.  I'm happy that it's the first thing that you see when you enter our house.  I've always loved it. And it adds just the right amount of height and drama to this space.

I've found a beautiful pair of lamps that I'd like to get for the dresser.  They were on sale when I found them and while I was painting and reupholstering and thinking, they went back to full price. So I'll wait til they go on sale again to get them.
It's hard to show you both sides of the room but I like they way they're tied together with the fabric and style now.
I'm planning on covering the back of the settee in the toile that's in the living room to further tie things together.
I'll be back soon to share how I painted this dresser and how to reupholster an occasional chair like the one in this room.

Hope you're having a wonderful day!

love and blessings~
"And He who sits on the throne said, "Behold, I am making all things new." And He said, "Write, for these words are faithful and true." Revelation 21:5

I'm joining these great parties:
commonground
impartinggrace
addisonmeadowslane
seekinglavenderlane
frenchcountrycottage
RattlebridgeFarm
rootedinthyme
thecharmofhome
akadesign
craftberrybush
oursouthernhomesc
dwellings-theheartofyourhome
coastalcharm
astrollthrulife
.stonegableblog
thriftydecorchick
.savvysouthernstyle
diybydesign.
Standard
Home & Garden, Tips & How To

Really BIG Changes in the Entry

Sorry I've been gone this week! I have been working hard the last several days. And it's resulted in lots of changes in our entry.

Do you remember that I mentioned I found a great French dresser a couple of weeks ago for $100? My sweet sons carried it all the way down to the basement while I decided where I was going to put it. How much easier it would have been to leave it in our front entry because that's where I decided I wanted it to go!  lol  Poor guys!  It's very heavy.

It started out looking like this!
Now it looks like this! I also recovered this chair in my faux silk plaid that I used in the living room.

And put the same plaid on my antique settee that sits on the other end of the entry!  I haven't finished the trim yet on these two pieces but will do that in the next couple of days.
For those of you that might not remember this is what our entry looked like the last time you saw it.  I love, love, love this table (and all the tables) that my husband has made but felt this side of the room was a lot more rustic than the other side.  Now it's not! This beautiful table has found a new home in our rustic basement.

I also painted the shutters in this room a medium brown.

This painting has been in our master bedroom.  I bought it at Kirkland's about 15 years ago when we lived in Virginia.  I'm happy that it's the first thing that you see when you enter our house.  I've always loved it. And it adds just the right amount of height and drama to this space.

I've found a beautiful pair of lamps that I'd like to get for the dresser.  They were on sale when I found them and while I was painting and reupholstering and thinking, they went back to full price. So I'll wait til they go on sale again to get them.
It's hard to show you both sides of the room but I like they way they're tied together with the fabric and style now.
I'm planning on covering the back of the settee in the toile that's in the living room to further tie things together.
I'll be back soon to share how I painted this dresser and how to reupholster an occasional chair like the one in this room.

Hope you're having a wonderful day!

love and blessings~
"And He who sits on the throne said, "Behold, I am making all things new." And He said, "Write, for these words are faithful and true." Revelation 21:5

I'm joining these great parties:
commonground
impartinggrace
addisonmeadowslane
seekinglavenderlane
frenchcountrycottage
RattlebridgeFarm
rootedinthyme
thecharmofhome
akadesign
craftberrybush
oursouthernhomesc
dwellings-theheartofyourhome
coastalcharm
astrollthrulife
.stonegableblog
thriftydecorchick
.savvysouthernstyle
diybydesign.
Standard