Home & Garden

Our Master Bathroom

The day after my last post, the demo crew showed up and we began the process of remodeling our master bathroom. I'm sorry it has taken me SO long to share it with you!

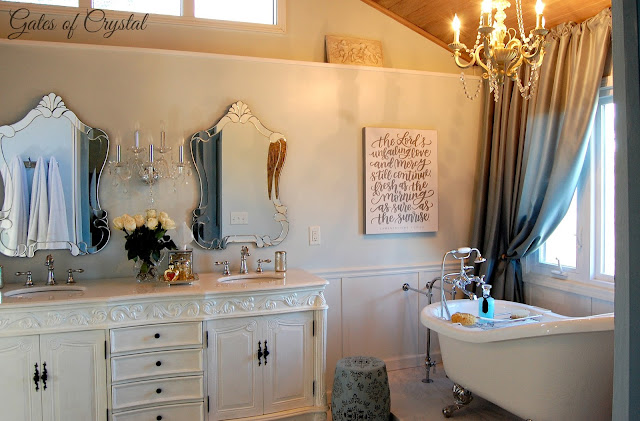
We absolutely love it! It's girly and romantic and over-the-top and still - my husband loves it, too!

This is the first time that we've ever hired professionals to do the work for us. I had imagined a simple, quick process but we ran into some complications that slowed us down and forced us to make some changes.


The main one was a drain pipe placement that our plumber said that "in the 20+ years of his being a plumber, he had never seen anything like it!"  We were not able to figure out if our master bath was an addition after the house was built, or if it was a walk-in closet and half bath that was changed to a master bath, but whatever it was, it had resulted in this drain pipe being 6" out from the wall and 6" up off the floor.

Usually, it would be in the wall or floor but because of the ceiling of the family room, which runs along this wall, it could not be put there. (see the silver flashing at an angle in the wall?)

This is our bathroom before. You can see how the previous vanity and tub covered this pipe. This picture looks nice but things were definitely worn.

We had two choices: a) tear out about 20' of floor that runs under multiple closets and walls and lay a new drain pipe under the floor connecting to a 'normal' drain pipe in the adjacent bathroom, or b) build a new wall and platform,for the tub, to cover the existing drain pipe. *sigh*

Our new claw foot tub was already sitting in a crate in our garage but I still paused for about two weeks trying to decide what to do. I had envisioned a wide, open floor plan with our vanity and tub sitting in the room and I was very disappointed.

And this also meant that my husband would need to build a wall and platform and that everything would stop until this was done.

But that's what we did.
This is the view looking from our tub to the shower room.

So, a two week estimate turned into an eight week long job. We had to cancel our trip to Colorado and stay home and finish a bathroom. I share all this not to complain but in case you think you're the only one that has encountered obstacles when it comes to remodeling. I pretty much think it's the norm.

And it was well worth it!

Down a hallway, lined with closet doors, is our toilet/shower room. We used the same tile in our shower as the floors. It's a marble-looking porcelain set on a diagonal with a very small grout line. I loved this tile because although I could not get a very clear picture, there's also a faint gold edge to gray veining. The floor is a preset octagonal tile in a coordinating gray.

Our tile expert set the tile so that the vein was flowing vertically.  Our shower is double with a rain head on one side and a hand-shower on the other.
I designed the simple insert shelf and our tile layer carried it out beautifully!

Our bathroom ceiling is literally a hardwood floor product. It was a little dark and dated and I used SW Deer Valley, SW Chateau Brown, mixed with a little chalk paint additive and made the ceiling match our doors and woodwork in the rest of the house. Here's the before and after:
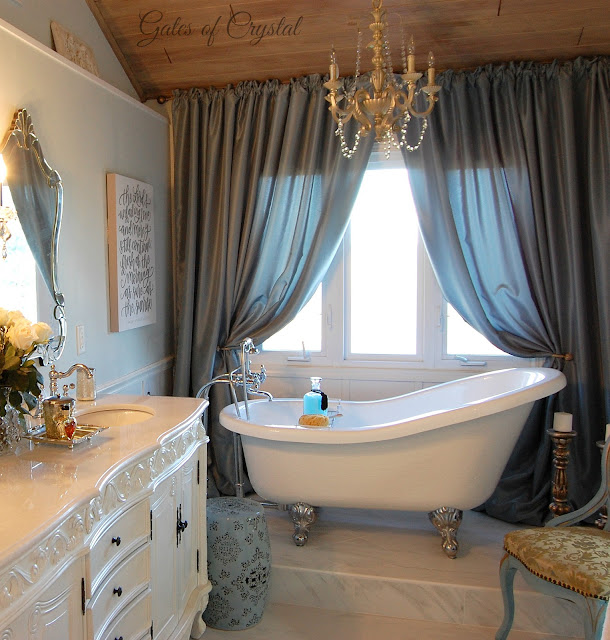
It softened the ceiling nicely, giving it the rustic wood feel that I love.  The chandelier in here is the same. I removed the crystals and then gave it a coat of antique white paint, then a coat of gold and silver.
I loved this picture from HobbyLobby. I wanted our bathroom filled with reminders of God's love and grace.

I have always loved the look of a claw foot slipper tub but didn't know if I would like the functionality. Without being too personal, I do! It's very comfortable and I love having the spray handle for rinsing. I'm a bath-person and it has fulfilled all my dreams! ha! And the platform, which I didn't plan, enables you to see out the window while bathing.
We still have a few things we'd like to do to. We'd like to replace all the closet doors that line the hall between the vanity and the shower room and there are two light fixtures in that area that we plan on replacing. We'll do those things eventually.

But for now, we are happy and so blessed!

love and blessings~


"Purify me with hyssop, and I shall be clean; Wash me, and I shall be whiter than snow." Psalm 51:7


vanity:- Amazon 
faucets - Joss & Main
mirrors - Amazon
wall sconce - Overstock
slipper tub - Menard's
floor and shower tile - Carpet Gallery
shower door - Menard's
shower faucets - Lowe's
towel racks and accessories - Amazon
toothbrush holders and vanity accessories - HomeGoods
tub rack - Joss & Main
tub accessories - HomeGoods
rug -HomeGoods
antique chair - bought from a friend
floor candlesticks - Furniture City Consignment
all wall art - HobbyLobby
curtains - I made them from Bluestone polyester Warehousefabrics

I'm joining these parties:
impartinggrace


Standard
Home & Garden

Our Master Bathroom

The day after my last post, the demo crew showed up and we began the process of remodeling our master bathroom. I'm sorry it has taken me SO long to share it with you!

We absolutely love it! It's girly and romantic and over-the-top and still - my husband loves it, too!

This is the first time that we've ever hired professionals to do the work for us. I had imagined a simple, quick process but we ran into some complications that slowed us down and forced us to make some changes.


The main one was a drain pipe placement that our plumber said that "in the 20+ years of his being a plumber, he had never seen anything like it!"  We were not able to figure out if our master bath was an addition after the house was built, or if it was a walk-in closet and half bath that was changed to a master bath, but whatever it was, it had resulted in this drain pipe being 6" out from the wall and 6" up off the floor.

Usually, it would be in the wall or floor but because of the ceiling of the family room, which runs along this wall, it could not be put there. (see the silver flashing at an angle in the wall?)

This is our bathroom before. You can see how the previous vanity and tub covered this pipe. This picture looks nice but things were definitely worn.

We had two choices: a) tear out about 20' of floor that runs under multiple closets and walls and lay a new drain pipe under the floor connecting to a 'normal' drain pipe in the adjacent bathroom, or b) build a new wall and platform,for the tub, to cover the existing drain pipe. *sigh*

Our new claw foot tub was already sitting in a crate in our garage but I still paused for about two weeks trying to decide what to do. I had envisioned a wide, open floor plan with our vanity and tub sitting in the room and I was very disappointed.

And this also meant that my husband would need to build a wall and platform and that everything would stop until this was done.

But that's what we did.
This is the view looking from our tub to the shower room.

So, a two week estimate turned into an eight week long job. We had to cancel our trip to Colorado and stay home and finish a bathroom. I share all this not to complain but in case you think you're the only one that has encountered obstacles when it comes to remodeling. I pretty much think it's the norm.

And it was well worth it!

Down a hallway, lined with closet doors, is our toilet/shower room. We used the same tile in our shower as the floors. It's a marble-looking porcelain set on a diagonal with a very small grout line. I loved this tile because although I could not get a very clear picture, there's also a faint gold edge to gray veining. The floor is a preset octagonal tile in a coordinating gray.

Our tile expert set the tile so that the vein was flowing vertically.  Our shower is double with a rain head on one side and a hand-shower on the other.
I designed the simple insert shelf and our tile layer carried it out beautifully!

Our bathroom ceiling is literally a hardwood floor product. It was a little dark and dated and I used SW Deer Valley, SW Chateau Brown, mixed with a little chalk paint additive and made the ceiling match our doors and woodwork in the rest of the house. Here's the before and after:
It softened the ceiling nicely, giving it the rustic wood feel that I love.  The chandelier in here is the same. I removed the crystals and then gave it a coat of antique white paint, then a coat of gold and silver.
I loved this picture from HobbyLobby. I wanted our bathroom filled with reminders of God's love and grace.

I have always loved the look of a claw foot slipper tub but didn't know if I would like the functionality. Without being too personal, I do! It's very comfortable and I love having the spray handle for rinsing. I'm a bath-person and it has fulfilled all my dreams! ha! And the platform, which I didn't plan, enables you to see out the window while bathing.
We still have a few things we'd like to do to. We'd like to replace all the closet doors that line the hall between the vanity and the shower room and there are two light fixtures in that area that we plan on replacing. We'll do those things eventually.

But for now, we are happy and so blessed!

love and blessings~


"Purify me with hyssop, and I shall be clean; Wash me, and I shall be whiter than snow." Psalm 51:7


vanity:- Amazon 
faucets - Joss & Main
mirrors - Amazon
wall sconce - Overstock
slipper tub - Menard's
floor and shower tile - Carpet Gallery
shower door - Menard's
shower faucets - Lowe's
towel racks and accessories - Amazon
toothbrush holders and vanity accessories - HomeGoods
tub rack - Joss & Main
tub accessories - HomeGoods
rug -HomeGoods
antique chair - bought from a friend
floor candlesticks - Furniture City Consignment
all wall art - HobbyLobby
curtains - I made them from Bluestone polyester Warehousefabrics

I'm joining these parties:
impartinggrace


Standard